This is a long form video of repairing the workhorse forge of the shop. This is a double burner propane forge I purchased from Front Step Forge some 7 or 8 years ago and has been very reliable. After years of wear and tear, it was finally time to fix up the interior.
This was a custom order we received from some folks in the US. They had a rough design in mind, and it was up to us to decide on the execution of it. It’s an interesting process where sketch means reality, working within the constraints of the material and the functional requirements of the project (in this case, it was a sign that could be hung up securely, was black in colour and would be resistant to the outdoor elements).
The final dimensions were roughly 36″ across and 24″ tall by 1″ deep. The finish is a matte black Rustoleum spray paint. The frame was constructed with hot rolled mild steel and assembled via welding.
The completed piece with a matte black finish.The blueprint of the sign, to scale.
The design was originally created at a much smaller scale to ensure our customer was satisfied with it. Once that was finalized, we printed it at a 1:1 scale on multiple pieces of 8.5″ x 11″ printer paper, and the whole design transferred to a piece of scrap plywood.
The forged cross.
Starting to create the forged pieces and using the transferred design as a reference. This was a technique I learned in an ABANA course on making a grille. The cross was forged from 1/2″ square bar, upset at the ends.
Adding the scrolls on either side.
More pieces are added. The printer paper was covered in blue chalk on the back and I used a ball point point to trace the lines, thus transferring the design onto the plywood. I didn’t have a piece of rusty sheet metal large enough for the project. Metal is preferable because I’d be able to place a hot piece of steel against the design to see if it needed tweaking. In this case, I had to cool the part enough so that it wouldn’t scorch the wood.
The sign assembled together with scrolls and backing.
All the pieces are collected here, but not assembled. The penny scrolls on the sides of the frame were replace with a tapered scroll in the end.
Detail of the cross.
The “crown of thorns” detail was a tricky bit of work. I wasn’t sure exactly how I was going to tackle transforming that bit of design into reality, until one night I suddenly thought of barbed wire. The wire was just the right scale for the project, so I took a length of it and wrapped it up around itself.
A detail view of the edge and plate backing..From another angle.Detailing of scrolls.
Here we can see as the project came along that the side scroll finials changed from penny to tapered. The customer preferred the look of these finials, and it was a quick enough job to change them. The top and side scrolls met at the corner and were welded together.
Detail of the finished cross.Detail of leaf scroll.Detail of completed scrolls.The completed piece with a matte black finish.
Ornamental ironwork is a very creative process and I enjoy the occasional project.
If you have an idea that you would like to see come to life, send us an email at info@reforgedironworks.com
A local client contacted me about forging a railing for their front step. It went through a couple iterations before the client was happy with the design I drew up for them. Functionality is always a top concern, and the client was happy to let me handle the details of the ironwork and finishing.
The railing just after installation.
The installed railing was secured with anchor bolts into the wall on the top step, and concrete anchor bolts at the bottom. The rail itself is a solid 1/2″ x 1 1/2″ steel bar.
Side view of the piece.Detail of leaf scroll.
The leaf finial scroll at the front and end of the rail were forged separately from 1/4″ x 1″ bar, and then riveted into place. I was working within the limitations of my workshop, and being unable to forge a 6′ length of heavy bar, while keeping modern welding to a minimum, meant using the traditional riveting technique.
Detail of bottom scroll.
Each scroll is a snub nosed finial forged from 1/4″ x 1″ flat bar. The pieces were forged such that each scroll appears to flow out of the proceeding one, creating a sense of movement down the rail.
Detail of end leaf scroll.
The wall mount was forged from plate and given a leaf-type texture to tie in the motif. The second leaf finial scroll can be see here with the rivet details below. The wall mount was welded to the rail.
Top view where the connection between the pieces is visible.A complete view of the railing.Here all the leaf scrolls and spirals are shown.
The post is simply a 1″ square tube. Budget constrains required that I use modern welding in many places. Traditionally the post would be solid steel and connected to the rail and base plate with mortise and tenon joinery.
Left side view of the railing.
This photo really capture the flowing effect of the progressively enlarging scrolls “tumbling” down the under side of the rail.
Left detail of bottom scroll.Detail of middle scroll.Side view of scroll.
The finish was something I agonized about during the entire project. I detest paint finishes for a number of reasons, the most important being that it obscures the naturally beautiful finish that comes with forged ironwork. I consulted with another blacksmith with more experience in outdoor ornamental pieces and I settled on a mix of linseed oil, beeswax and turpentine tinted with stove black, a polish for wood stoves.
Before connecting all the pieces and after polishing all the surfaces with a wire wheel brush, I heated them to a black heat in the forge. This creates a uniform dark gray colour on the steel and helps to protect it from rust. The dark gray comes from a thin layer of scale that forms from heating.
Once the piece was assembled, I applied the linseed oil finish to the rail. Now, one of the benefits of a linseed oil finish is that it can be reapplied easily to the piece. If rust does happen to form in a spot, it can be scoured away and linseed oil applied. No need to repaint the entire rail in the future.
A 9″ hand forged blade mounted in an elk handle with iron guard and pommel.
Leather sheath created by Dave Lougheed.
This was a commission piece for a fellow Creston valley resident. She wanted a hunting style knife with an antler handle for her husband, engraved with the words “Irish” and “Wrath” as a testament to his heritage. Otherwise the design details were left up to me.
The knife design was based on a outdoor survival book I picked up a few years ago called “Bushcraft – Outdoor Skills and Wilderness Survival” by Mors Kochanski. Accordingly, I asked the client and her husband to stop by so I could measure his palm width, and both the handle and blade length were created to suit (being 4 1/2″ long for each).
Kochanski advises that the spine of the blade be flat or slightly dropped at the tip, and I decided to use a tanto kata that was generously given to me by Dave J Friesen of Crossed Heart Forge to help me shape the profile of the blade. Since the handle was made from an elk antler (also from Dave), I decided on a rat tail tang with a flat iron pommel so that I could rivet the knife together.
The knife was forged from an old carriage spring dating back to the 1800s, using a charcoal forge and Japanese fuigo bellows. I have finally started making my own charcoal so I’m proud to say that this knife was forged using fuel I made earlier in the year.
I chose to use yaki-ire to temper the blade, and the hamon can be seen from the hardening process. This is more thoroughly explained on the Elk Knife Process page.
Scrap 1/8″ plate steel with a hammered pebble texture form the guard and pommel. They were left just slightly oversized to the elk handle, and handle itself has had nothing done to it.
The farrier who stops by our little homestead every now and then to tend to our Norwegian Fjord was kind enough to supply us with rasps that are too worn done for the work she does. In trade, we forged this belt buckle for her from one of the rasps she gave us.
I used a angle grinder to cut the rasp in half and forged it oval-like, and put in grooves as one would see on an actual horseshoe. This was all made to the farrier’s criteria but she left the creative details up to me.
Rasps are made of a steel that has a higher amount of carbon in it. That can make welding a tricky thing. Luckily I know an experienced welder who managed that part of it. Just to be extra careful, I tempered the buckle after welding to remove any stresses that might have been in the welds. Best to have relaxed steel if it’s allowed.
Turning scrap into functional art is what we love to do best.
This was a custom order from Ragnar the Trader, a long time customer and friend of the forge. It’s made from reclaimed spring steel, hand polished with diamond stones and it makes its home in a hand sewn leather sheath embossed with a Viking dragon.
The dagger is forged from a single piece of spring steel. The blade was hardened using the traditional yaki-ire process, where a clay slip is applied to the blade so that hardening is localized to the edges. After tempering, the edge is approximately rated to hardness of 55-60 HRC using a set of Japanese hardness testing files.
The handle is shaped for comfort and a sure grip. The handle wrap is tanned leather lace.
The sheath is made from vegetable tanned leather, 8 oz weight, hand dyed and embossed with a Viking dragon motif.
A simple belt loop keeps the dagger and sheath in place.
We do custom work all the time. Go to our contact page and tell us about your idea.
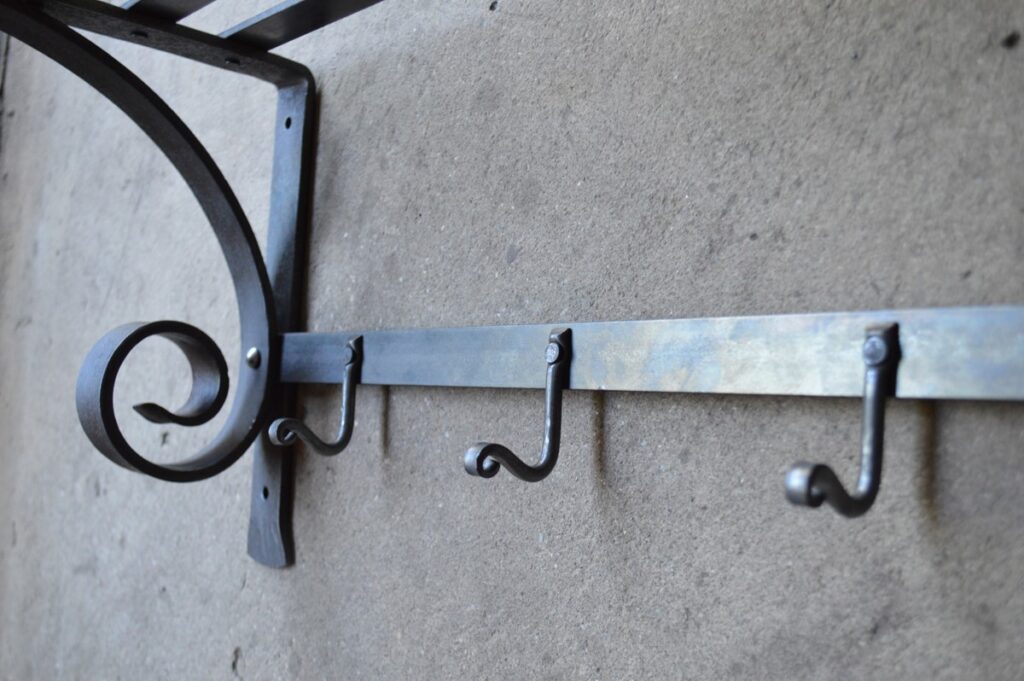
A neighbour and friend of the forge recently commissioned a coat rack from us, and we took their idea and made it our own. Instead of using any welds, the entire piece uses traditional blacksmith joinery techniques.
The finish for the coat rack and shelf unit was a bit of polishing with a wire brush, heating the steel to a “black heat” for a uniform colour, and an application of beeswax and linseed oil.
The scroll arms on either side were forged from this old piece of scrap that came from an old homestead on the other side of our little valley.
Bradding, or riveting as its referred to nowadays, was the technique used to attach all the separate pieces into one. A countersink was drilled in places where a rivet head standing proud of the surface would have interfered with function. Lorinda and I worked as a team to assemble all the parts together
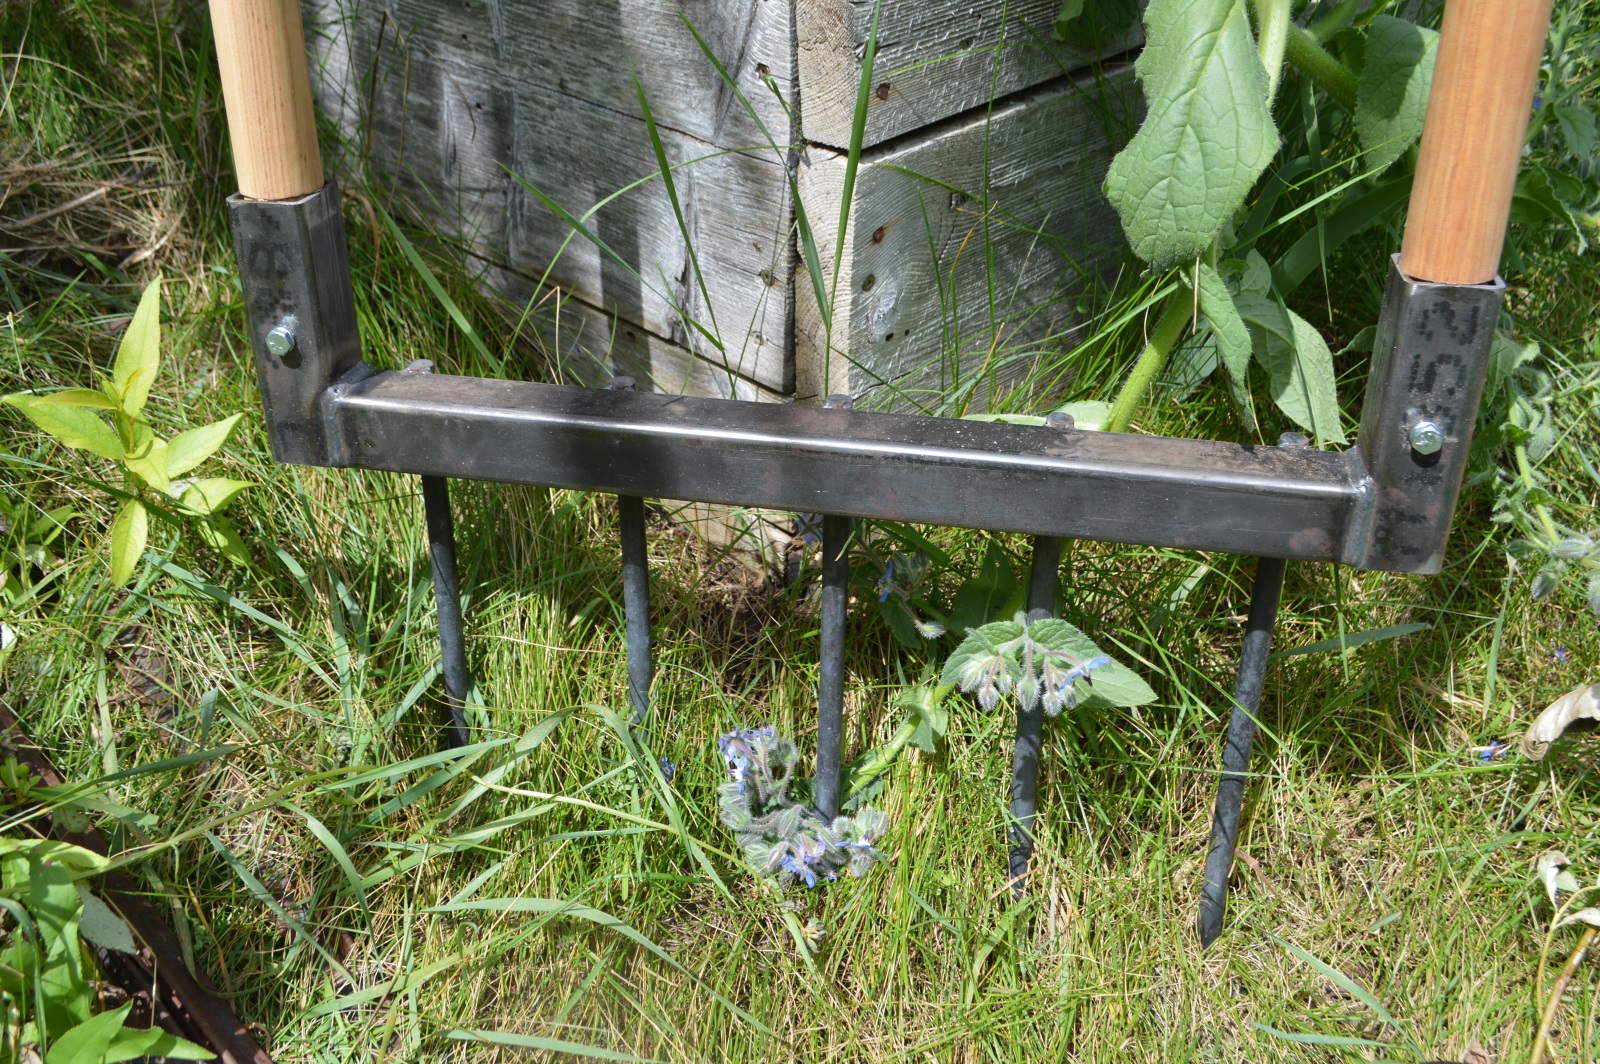
This summer, we forged a custom broadfork for the local farmers at Cartwheel Farm. We’ve been receiving a CSA from Cartwheel for the past three years, and always appreciate their array of organic vegetables throughout the summer. This dedicated little farm is now working to set up greenhouses that will enable them to grow throughout the year; year-round produce is their end goal. Cartwheel Farm is a family operated farm, run by husband and wife duo, Laura and Nigel Francis, who strive to bring healthy food to their community and enhance vibrancy to the land they work with. They provide thoughtfully written newsletters with the deliveries, which include recipes and tidbits such as how to utilize more of the vegetables provided, as well as updates on their gardens and practices. It was from these letters that I learned that I could use carrot tops in my cooking, and I appreciate the recipes and suggestions for the veggies provided. A little inspiration is always good! A big thank you to Cartwheel Farm for what they do, and the nutritious food they provide to us and our community.
We try our best to support small-scale farmers, as we believe this is one part to maintaining food health and security around us. The huge mono-crop farms run precariously, with their resource use and dependency on many fertilizers and chemicals, and don’t tend to support the health of the land they take from. It feels better to buy from someone who we know is actively engaged in promoting the health of the soil, air, and ultimately the community and environment around them.
And it feels good to create tools that we believe will also add to the health of the land, and symbiotically, the health of those who use them as well. I personally have felt the tremors in my body after running a rototiller for over an hour to till a garden bed, and it was not a pleasant experience. Compared to using a broadfork where you are working in the peace and quiet of the natural surroundings, and in rhythm with your own body, it brings that part of gardening to a whole new experience. Less worms and soil health are destroyed in the process of hand-tilling, and worm health is a key factor in promoting rich soil, with their contribution of tilling (tunneling) and providing one of the best fertilizers around with their poop. Working with a hand-tool also encourages you to reach down and check the soil with your hands, connecting with the microbes in the soil. Another bonus is that it’s a good work-out, and the tool is designed to work in a way where you let the weight of it sink the tines into the soil, rather than having to drive it down. No resources are consumed with the use of hand-tools either.
The Cartwheel Farm family
I believe in the inter-connection of all living beings, and that our intention affects so many things around us. Holding intention for building soil health to grow nutritious food as I work in a less-damaging and resource-consuming manner goes a long way to connecting me to gratitude and abundance, and even staying more present in the moment.
We’re happy to be providing this tool to a farm that shares this love of working with the natural ecology, and with the intention of enhancing the health of the soil. And we hope all of our broadfork customers enjoy using this versatile tool. Not only is it good for preparing garden beds and weeding, but it also works well for harvesting root veggies, and turning soil with compost and mulch after the gardening season. These tools, like all of our products, come with a life-time warranty because we build them to last for generations to come.
For those who live in the Creston area, we have this tool for sale at the Morris Flowers greenhouse, and in Nelson at Ellison’s Greenhouse. They can also be ordered via our website, and customized if needed.
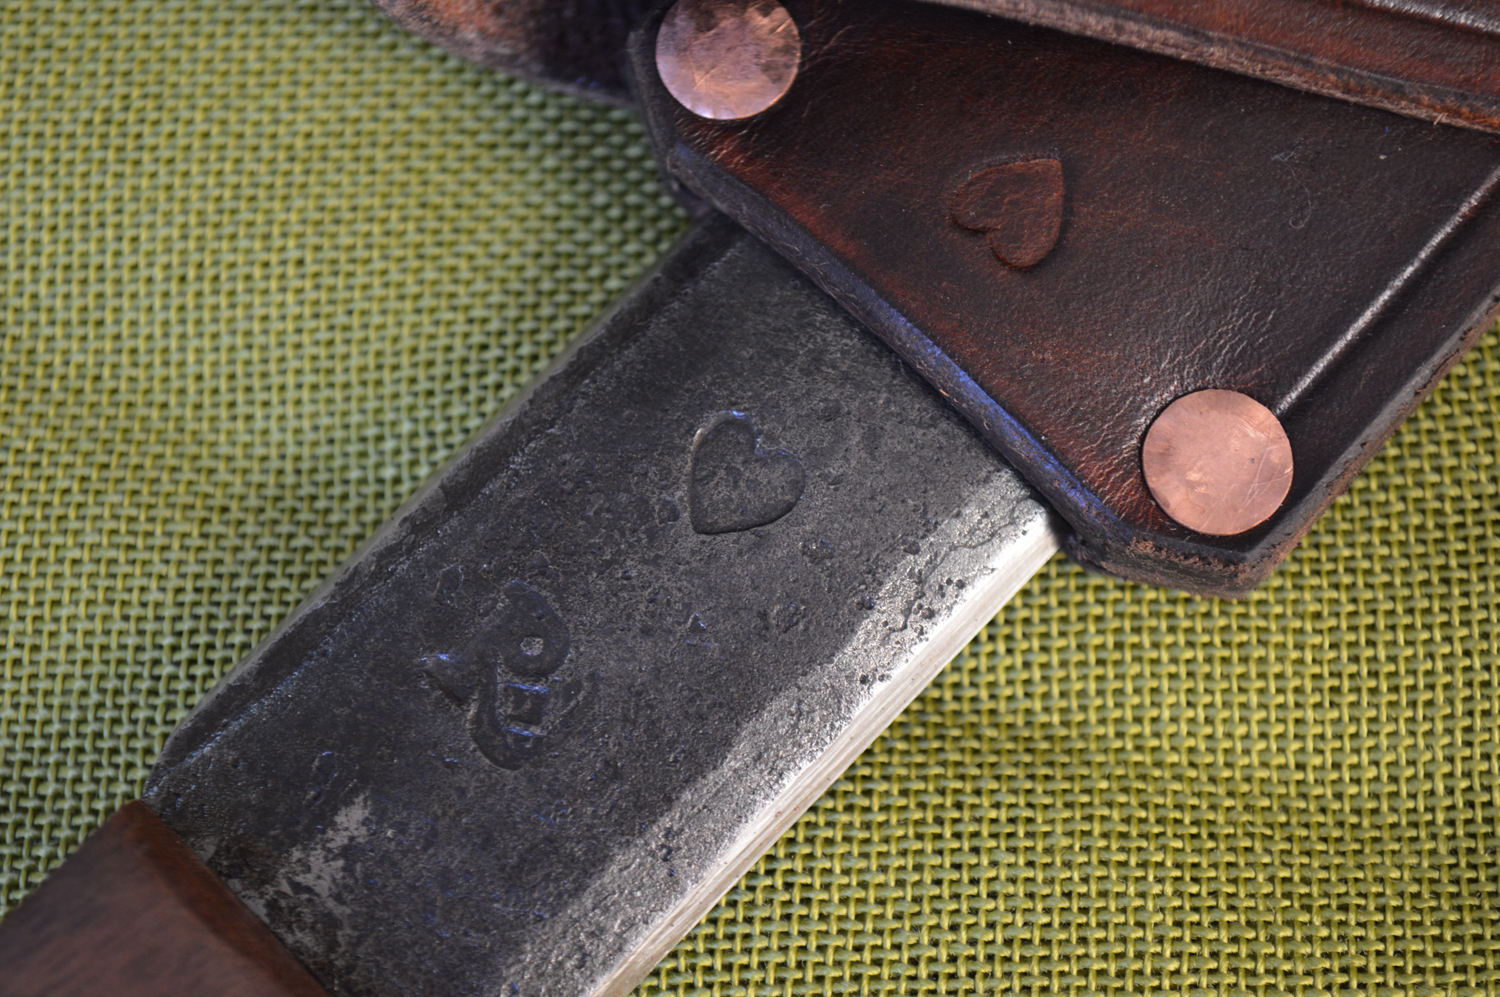
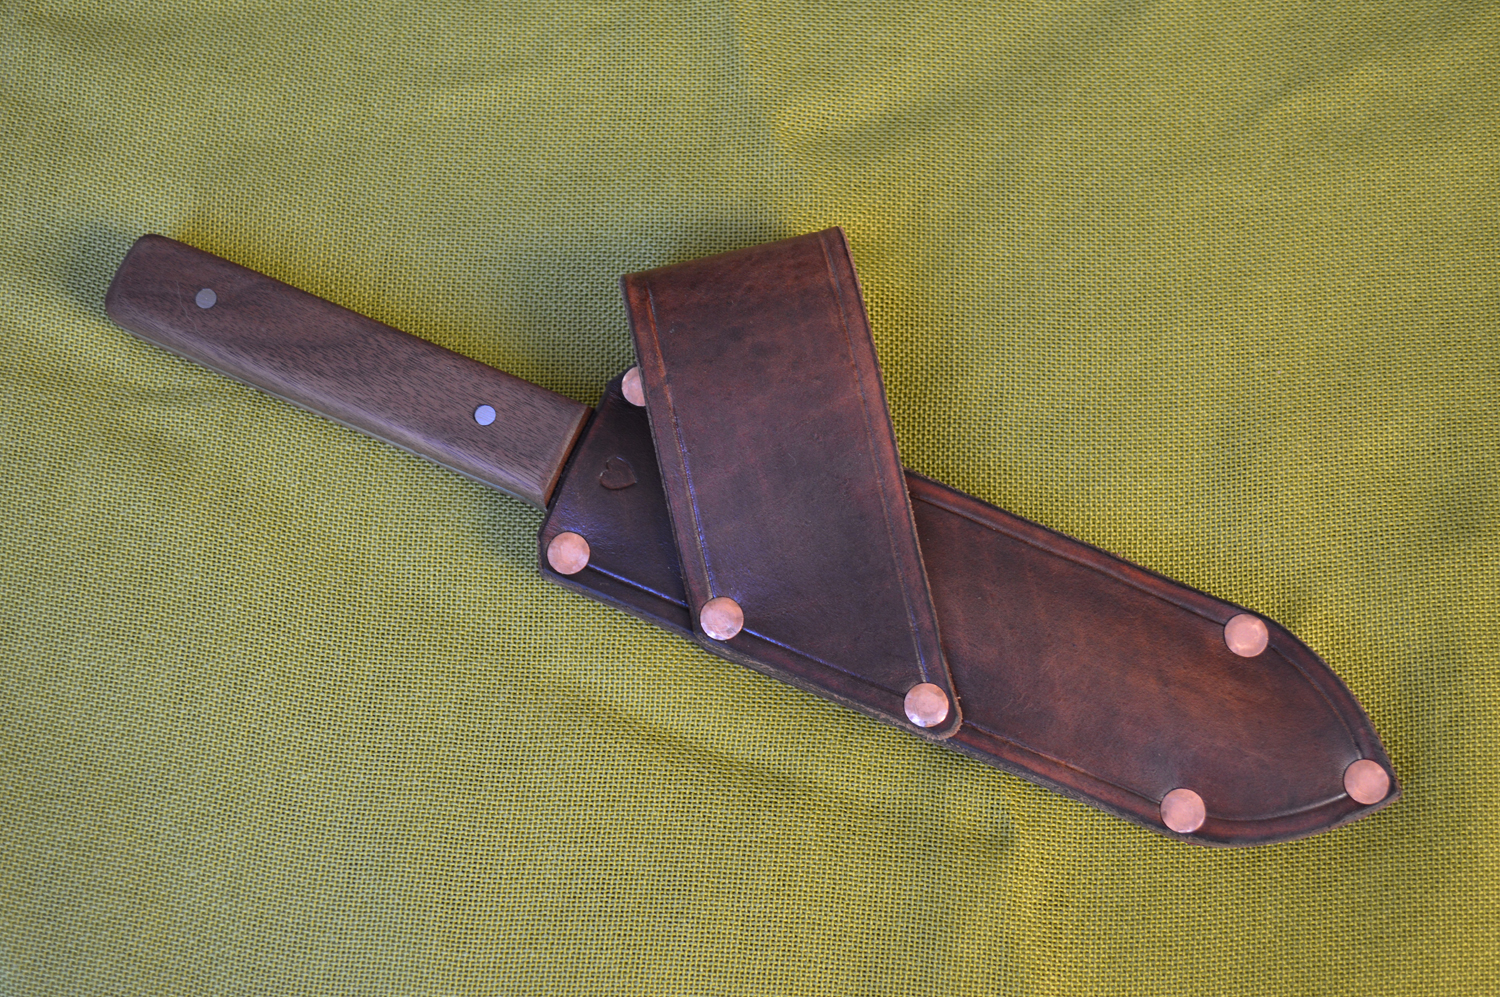
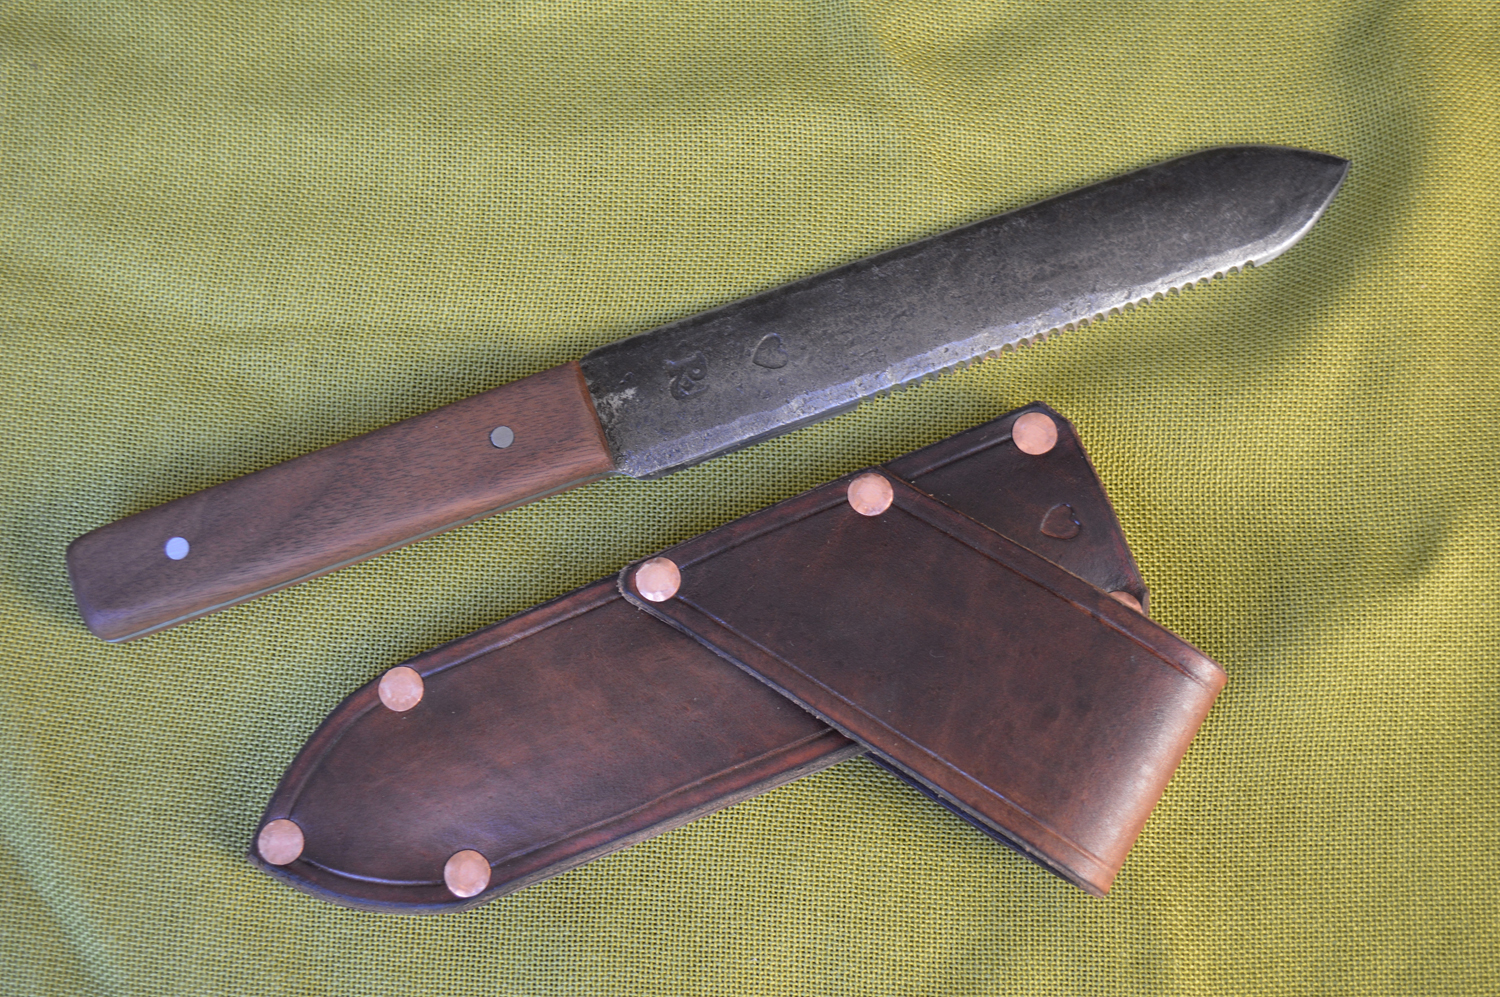
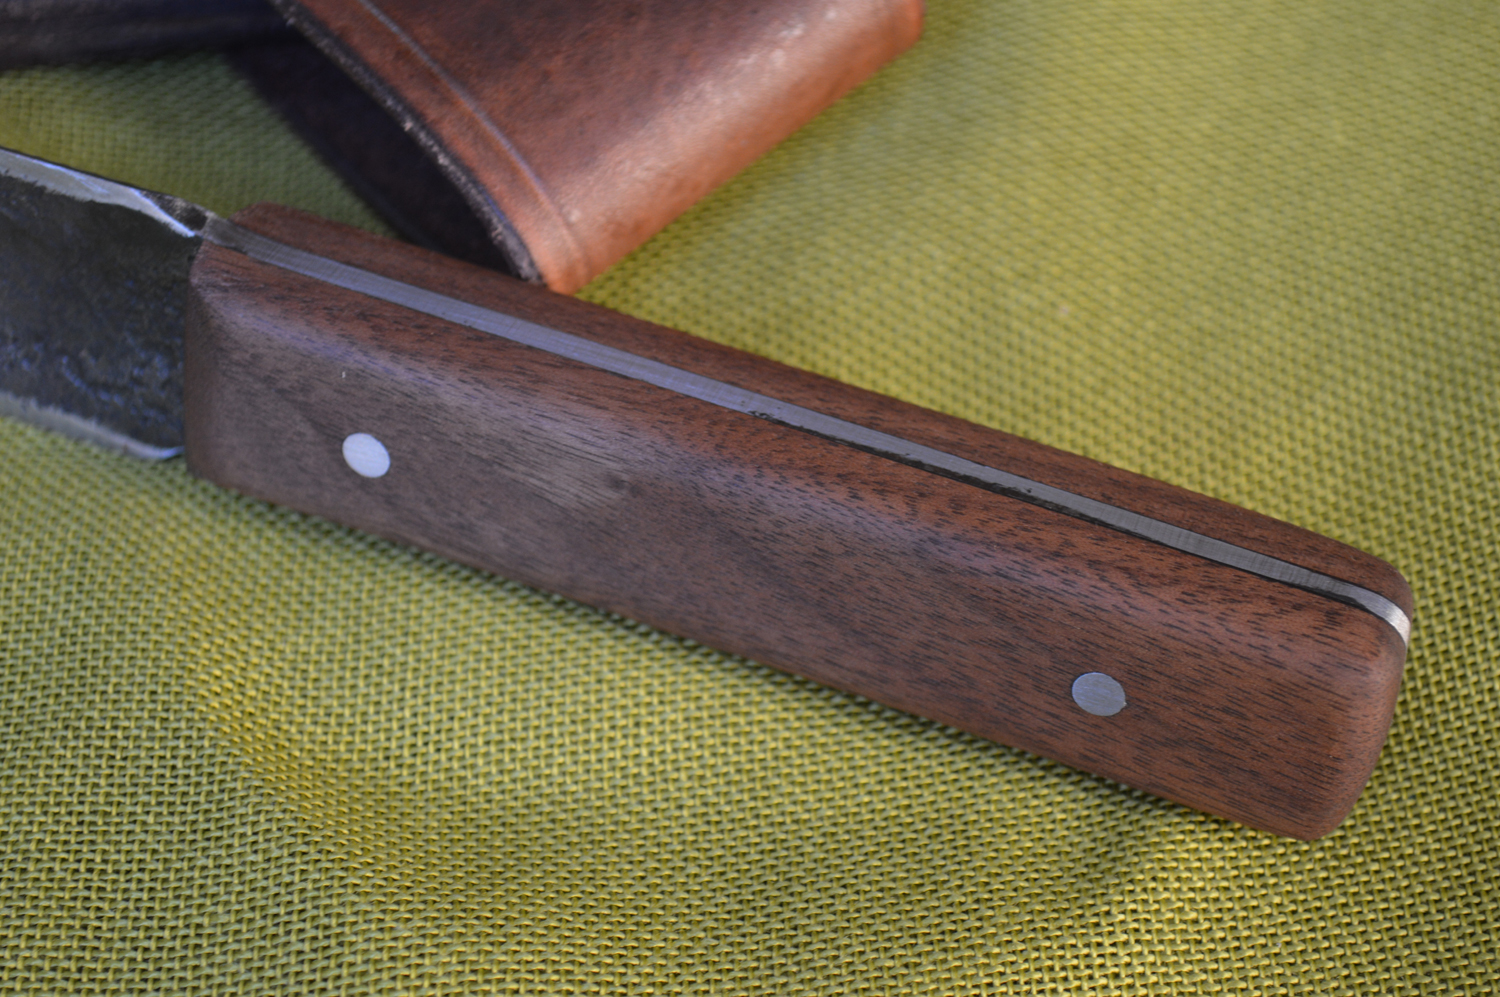
I had the honour of hand crafting a hori hori for my neighbour to give as an anniversary gift. Since our forge is small scale, it’s agile and adaptable, and well suited to custom projects such as this one. Details such as having a heart stamped in both blade and sheath to make the knife truly unique, and making the sheath and serrations to match the needs of its owner, aren’t typically found with factory produced goods. Neither do my wife and I wish to compete against machines; it’s a losing battle every time. Instead we aim to provide an alternative: handmade, slowcrafted goods forged from reclaimed and recycled materials.
This hori hori was forged from reclaimed 1/4″ thick leaf spring, quenched in heated canola oil and tempered to approximately 50 to 55 HRC. The softer temper guards against breaking, and sharpening with a file much easier.
Detail of the matching heart stamp on blade and sheath. The heart stamp was a custom request from the customer.
Reclaimed hardwood slabs (most likely walnut) are pinned and epoxied to the tang. The tang is heat treated to prevent bending.
The serrations are hand filed with a chainsaw file, running four inches along one side of the blade. The teeth are on the top side of the blade for a right handed user, and would be on the opposite side for a left handed gardener.
The veg-tanned leather sheath is hand dyed and riveted with copper. The cross draw design of the sheath allows for easy access to the knife even when kneeling down, which is common for gardeners and foragers alike.
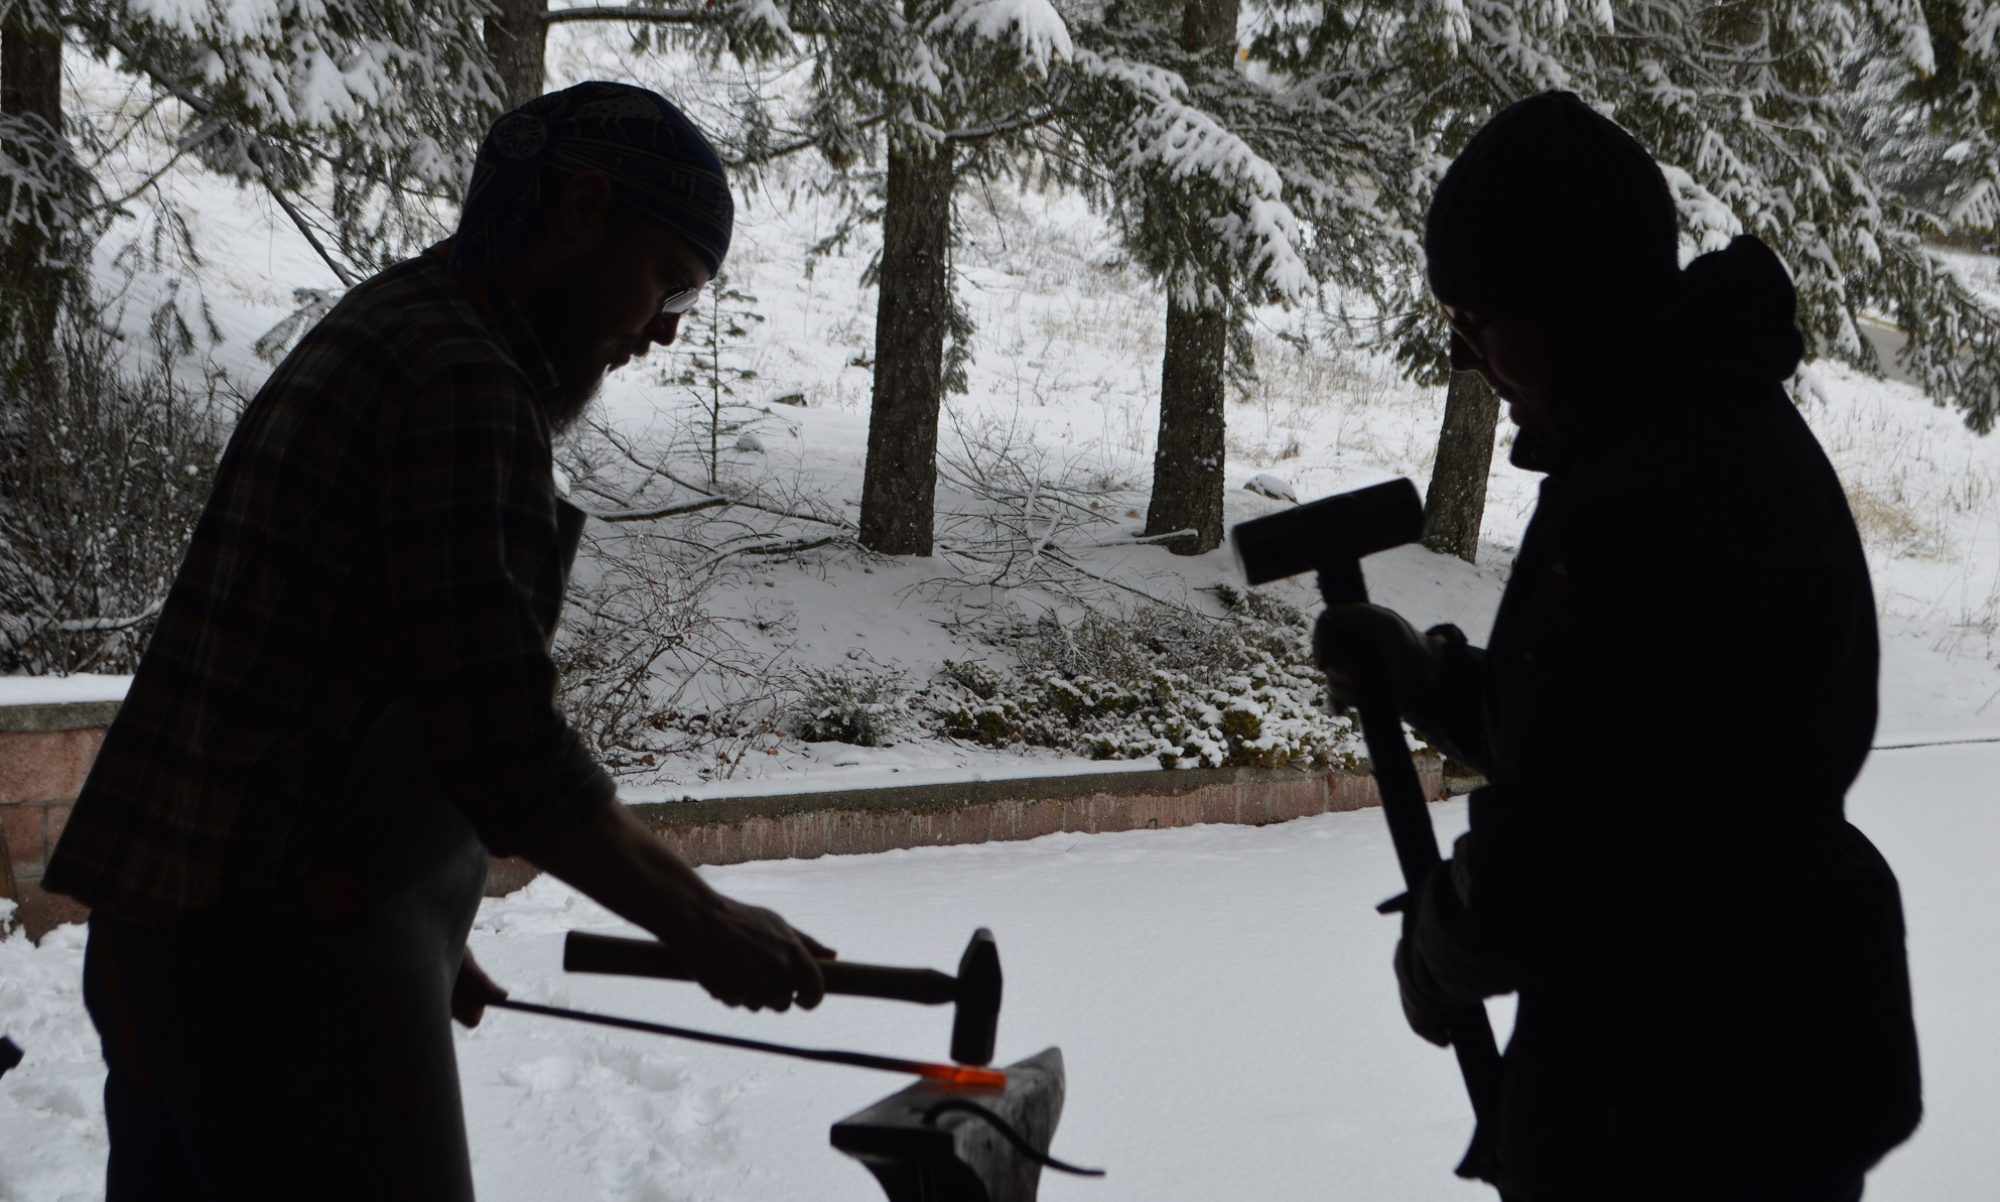
Blacksmithing can be a lonely craft. Thankfully, I have my wife to keep me company in the shop to help with striking, designing awesome driftwood and iron pieces and generally being a great support in our endeavours. This past weekend was the first Kootenay Blacksmith Association meeting that was held since before the covid pandemic hit the world, and I didn’t realize how much I missed it.
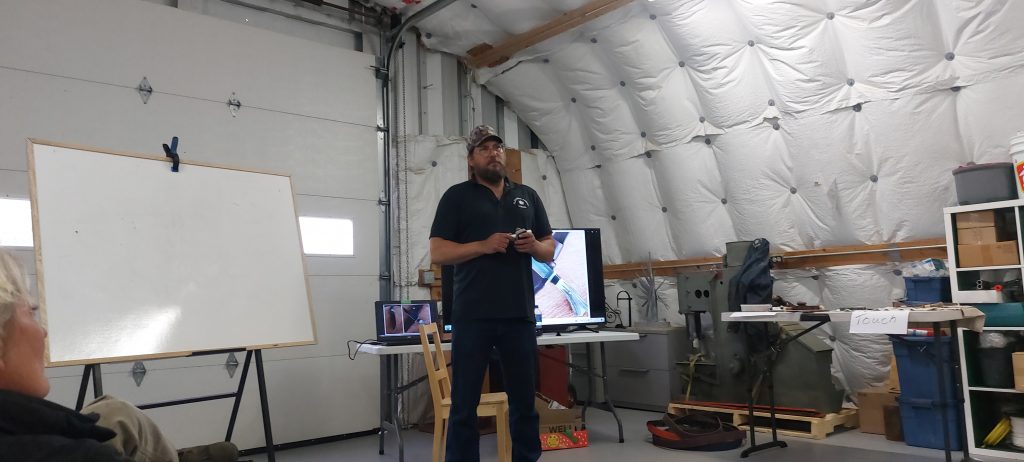
Troy speaking at the spring Kootenay Blacksmith Association conference.
This spring, the KBA invited a bladesmith, Troy Flanders of Flanders Forge, to speak to the crowd. What a source of information, and he barely scratched the surface of the bladesmithing craft. Regardless, I learned much from him and also got some useful tips on improving my forging techniques from a fellow member. I’m currently finishing up a hori hori for a customer, putting what I learned into practice and I can honestly say this is the best hori I’ve made yet.
Some of Troy Flander’s work.
I’ve been a professional blacksmith for over five years now, so I figure I know quite a bit about hammering steel and all the other accompanying skills that go with it. However, in order for me to learn anything from other ‘smiths I have to do two things: swallow my pride and listen. There is a vulnerability that comes with that because I have to admit to myself that I don’t know everything, that there are others who are better at this stuff than I am, and the only way I can learn is by admitting that to myself and to others.
Thankfully, the KBA members are gracious and helpful folks (despite the stereotype of blacksmiths being ornery and secretive), and if you’re willing to be quiet and pay attention to what the older generation of craftsmen are saying, you might just learn a thing or two. If you’d like to keep up with the happenings of the Kootenay Blacksmith’s Association, go to their contact page to become a member: https://kootenay-blacksmiths.ca/contact-us/